React.js Component의 State 와 Props 사용하기 React.js 의 Component 에서 사용 할 데이터를 다루는 State 와 Props 에 대하여 알아보도록 하겠다.
1. 시작하기 Component 생성 및 모듈화 에서 사용하던 프로젝트를 계속해서 이어서 작성한다.
index.html
1
2
3
4
5
6
7
8
9
10
11
<!DOCTYPE html > <html > <head > <meta charset ="utf-8" > <title > React App</title > </head > <body > <div id ="root" > </div > <script src ="bundle.js" > </script > </body > </html >
index.js
1
2
3
4
5
6
import React from 'react' ;import ReactDOM from 'react-dom' ;import App from './components/App' ; const rootElement = document .getElementById ('root' ); ReactDOM .render (<App />
src/components/App.js
1
2
3
4
5
6
7
8
9
10
11
12
13
14
15
import React from 'react' ;import Header from './Header' ;import Content from './Content' ;class App extends React.Component { render ( return ( <div > <Header /> <Content /> </div > ); } } export default App ;
src/components/Header.js
1
2
3
4
5
6
7
8
9
10
11
import React from 'react' ;class Header extends React.Component { render ( return ( <h1 > Header</h1 > ); } } export default Header ;
src/components/Content.js
1
2
3
4
5
6
7
8
9
10
11
12
13
14
import React from 'react' ;class Content extends React.Component { render ( return ( <div > <h2 > Content</h2 > <p > Hey! </p > </div > ); } } export default Content ;
2. props props 는 컴포넌트에서 사용 할 데이터 중 변동되지 않는 데이터를 다룰 때 사용된다. parent 컴포넌트에서 child 컴포넌트로 데이터를 전할 때, props 가 사용된다. 예제를 통하여 이에 대하여 알아보겠다.
2.1 props 추가하기
컴포넌트에서 immutable (변하지 않는) 데이터가 필요 할 땐, render() 메소드의 내부에 안에 { this.props.propsName } 형식으로 넣고, 컴포넌트를 사용 할 때, < > 괄호 안에 propsName="value" 를 넣어 값을 설정한다.
Header 컴포넌트와 Content 컴포넌트가 props를 사용하도록 코드를 업데이트 해보도록 하자.
Header.js
1
2
3
4
5
6
7
8
9
10
11
import React from 'react' ; class Header extends React.Component { render ( return ( <h1 > { this.props.title }</h1 > ); } } export default Header ;
위와 같이 props 값이 렌더링 될 위치에 { this.props.propsName } 를 넣는다.
Content.js
1
2
3
4
5
6
7
8
9
10
11
12
13
14
import React from 'react' ; class Content extends React.Component { render ( return ( <div > <h2 > { this.props.title }</h2 > <p > { this.props.body } </p > </div > ); } } export default Content ;
contentTitle 와 contentBody props 를 넣어주었다.
2.2 props 사용하기 이제 App 컴포넌트에도 props 를 넣어주고, App 컴포넌트에서 사용되는 props 값을 child 컴포넌트들로 전달해도록 하자.
App.js
1
2
3
4
5
6
7
8
9
10
11
12
13
14
15
16
17
import React from 'react' ;import Header from './Header' ;import Content from './Content' ;class App extends React.Component { render ( return ( <div > <Header title ={ this.props.headerTitle }/> <Content title ={ this.props.contentTitle } body ={ this.props.contentBody }/> </div > ); } } export default App ;
index.js
1
2
3
4
5
6
7
8
import React from 'react' ;import ReactDOM from 'react-dom' ;import App from './components/App' ; const rootElement = document .getElementById ('root' ); ReactDOM .render (<App headerTitle = "Welcome!" contentTitle = "Stranger," contentBody = "Welcome to example app" />
2.3 기본 값 설정하기 props 값을 임의로 지정해주지 않았을 때 사용할 기본값을 설정하는 방법을 알아보도록 하겠다.
기본값을 설정 할 땐, 컴포넌트 클래스 하단에 className.defaultProps = { propName: value } 를 삽입하면 된다.
App.js
1
2
3
4
5
6
7
8
9
10
11
12
13
14
15
16
17
18
19
20
21
22
23
24
import React from 'react' ;import ReactDOM from 'react-dom' ;import Header from './Header' ;import Content from './Content' ;class App extends React.Component { render ( return ( <div > <Header title ={ this.props.headerTitle }/> <Content title ={ this.props.contentTitle } body ={ this.props.contentBody }/> </div > ); } } App .defaultProps = { headerTitle : 'Default header' , contentTitle : 'Default contentTitle' , contentBody : 'Default contentBody' }; export default App ;
index.js
1
2
3
4
5
6
import React from 'react' ;import ReactDOM from 'react-dom' ;import App from './components/App' ; const rootElement = document .getElementById ('root' ); ReactDOM .render (<App />
2.4 Type 검증(Validate)하기 컴포넌트 에서 원하는 props 의 Type 과 전달 된 props 의 Type 이 일치하지 않을 때 콘솔에서 오류 메시지가 나타나게 하고 싶을 땐, 컴포넌트 클래스의 propTypes 객체를 설정하면 된다. 또한, 이를 통하여 필수 props 를 지정할 수 있다. 즉, props 를 지정하지 않으면 콘솔에 오류 메시지가 나타나게 된다.
한번 Content 컴포넌트의 propTypes을 지정 해보도록 하자.
Content.js
1
2
3
4
5
6
7
8
9
10
11
12
13
14
15
16
17
18
19
import React from 'react' ;class Content extends React.Component { render ( return ( <div > <h2 > { this.props.title }</h2 > <p > { this.props.body } </p > </div > ); } } Content .propTypes = { title : React .PropTypes .string , body : React .PropTypes .string .isRequired }; export default Content ;
두 props 의 Type 를 모두 string 을 지정하고, body는 .isRequired 를 추가하여 필수 props 로 설정하였다.
이제 App 컴포넌트에서 잘못된 값을 줘보도록 하겠다.
App.js
1
2
3
4
5
6
7
8
9
10
11
12
13
14
15
16
17
18
19
20
21
22
23
import React from 'react' ;import ReactDOM from 'react-dom' ;import Header from './Header' ;import Content from './Content' ;class App extends React.Component { render ( return ( <div > <Header title ={ this.props.headerTitle }/> <Content title ={ this.props.contentTitle } body ={ this.props.contentBody }/> </div > ); } } App .defaultProps = { headerTitle : 'Default header' , contentTitle : 5 , contentBody : undefined }; export default App ;
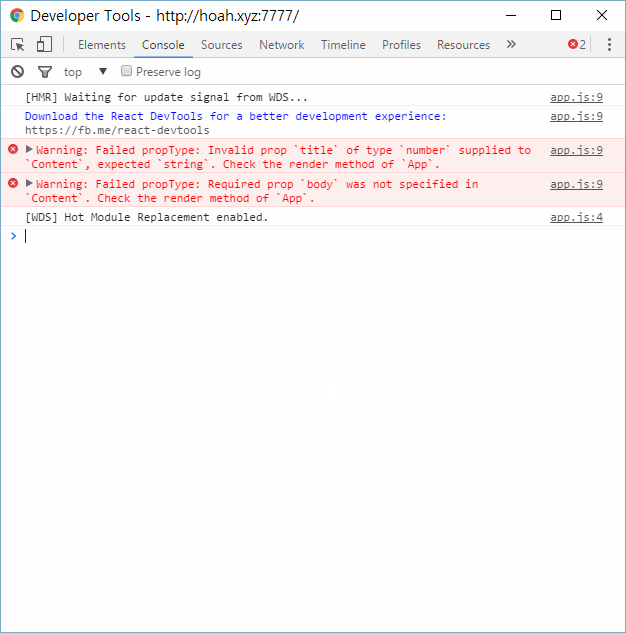
contentTitle 엔 숫자를 지정하였고, contentBody에는 빈 값을 전달하도록 설정하였다.
Validation이 실패하면 브라우저에서 다음과 같은 오류가 나타난다.
테스트가 끝나면 2.3 의 App.js 상태로 되돌리도록 하자.
예제
예제를 통하여 여러 종류의 Type 를 Validate 하는 방법을 알아보도록 하겠습니다. (reference: React.js 메뉴얼 API )
1
2
3
4
5
6
7
8
9
10
11
12
13
14
15
16
17
18
19
20
21
22
23
24
25
26
27
28
29
30
31
32
33
34
35
36
37
38
39
40
41
42
43
44
45
46
47
48
49
50
51
52
53
54
55
56
57
58
59
60
61
import React from 'react' ;class ValidationExample extends React.Component { } Content .propTypes = { optionalArray : React .PropTypes .array , optionalBool : React .PropTypes .bool , optionalFunc : React .PropTypes .func , optionalNumber : React .PropTypes .number , optionalObject : React .PropTypes .object , optionalString : React .PropTypes .string , optionalNode : React .PropTypes .node , optionalElement : React .PropTyps .element , optionalMessage : React .PropTypes .instanceOf (Message ), optionalEnum : React .PropTypes .oneOf (['News' , 'Photos' ]), optionalUnion : React .PropTypes .oneOfType ([ React .PropTypes .string , React .propTypes .number ]), optionalArrayOf : React .PropTypes .arrayOf (React .PropTypes .number ), optionalObjectOf : React .PropTypes .objectOf (React .PropTypes .number ), optionalObjectWithShape : React .PropTypes .shape ({ color : React .PropTypes .string , fontSize : React .PropTypes .number }), requiredFunc : React .PropTypes .func .isRequired , requiredAny : React .PropTypes .any .isRequired , customProp : function (props, propName, componentName ) { if (!/matchme/ .test (props[propName])) { return new Error ('Validation failed!' ); } } }; export default ValidationExample ;
3. State 컴포넌트에서 유동적인 데이터를 다룰 때, state 를 사용한다. React.js 어플리케이션을 만들 땐, state를 사용하는 컴포넌트의 갯수를 최소화 하는 것 을 노력해야 한다. 예를들어, 10 개의 컴포넌트에서 유동적인 데이터를 사용 하게 될 땐, 각 데이터에 state를 사용 할 게 아니라, props 를 사용하고 10 개의 컴포넌트를 포함시키는 container 컴포넌트를 사용하는것이 효율적 이다.
3.1 기본적인 사용 방법 StateExample.js (미리보기: JSFiddle )
1
2
3
4
5
6
7
8
9
10
11
12
13
14
15
16
17
18
19
20
21
22
23
24
25
26
27
28
29
30
import React from 'react' ;class StateExample extends React.Component { constructor (props ) { super (props); this .state = { header : "Header Initial state" , content : "Content Initial State" }; } updateHeader (text ){ this .setState ({ header : "Header has changed" }); } render ( return ( <div > <h1 > {this.state.header}</h1 > <h2 > {this.state.content}</h2 > <button onClick ={this.updateHeader.bind(this)} > Update</button > </div > ); } } export default StateExample ;
state 의 초기 값을 설정 할 때는 constructor(생성자) 메소드에서 this.state= { } 를 통하여 설정한다.
state 를 렌더링 할 때는 { this.state.stateName } 을 사용한다.
state 를 업데이트 할 때는 this.setState() 메소드를 사용한다. ES6 class에선 auto binding이 되지 않으므로, setState 메소드를 사용 하게 될 메소드를 bind 해주어야 한다. (bind 하지 않으면 React Component 가 가지고있는 멤버 함수 및 객체에 접근 할 수 없다.)
4. 적용: State 와 Props 유동적인 데이터를 렌더링하며, parent 컴포넌트와 communicate 하는 예제 컴포넌트 RandomNumber 를 만들어 보도록 하자.
RandomNumber.js
1
2
3
4
5
6
7
8
9
10
11
12
13
14
15
16
17
18
19
20
21
22
23
24
25
import React from 'react' ;import ReactDOM from 'react-dom' ;class RandomNumber extends React.Component { updateNumber ( let value = Math .round (Math .random ()*100 ); this .props .onUpdate (value); } constructor (props ) { super (props); this .updateNumber = this .updateNumber .bind (this ); } render ( return ( <div > <h1 > RANDOM NUMBER: { this.props.number }</h1 > <button onClick ={this.updateNumber} > Randomize</button > </div > ); } } export default RandomNumber ;
랜덤 숫자를 나타내는 h1 element와, 클릭 하면 새로운 랜덤값으로 바꾸는 button element를 렌더링 한다.
이 컴포넌트에서는 두가지 prop을 사용한다.
number: 랜덤 값
onUpdate: function 형태의 prop 으로서, parent 컴포넌트에 정의된 메소드를 실행 할 수 있게 한다.
코드 설명
Line 8: props 로 받은 함수를 실행한다.
Line 11 ~ 14: React 컴포넌트의 생성자 이다. super(props) 로 상속받은 React.Component 의 생성자 메소드를 실행 한 후, 입력한 코드를 실행한다. 13번 줄에서는 update 메소드에서 this.props 에 접근 할 수 있도록 binding 을 해준다.
Line 20: 버튼을 클릭하였을 시 update() 메소드를 실행한다.
이제, parent 컴포넌트인 App 컴포넌트에서 RandomNumber 컴포넌트를 사용해보도록 하자.
App.js
1
2
3
4
5
6
7
8
9
10
11
12
13
14
15
16
17
18
19
20
21
22
23
24
25
26
27
28
29
30
31
32
33
34
35
36
37
38
39
40
41
import React from 'react' ;import ReactDOM from 'react-dom' ;import Header from './Header' ;import Content from './Content' ;import RandomNumber from './RandomNumber' ;class App extends React.Component { constructor (props ) { super (props); this .state = { value : Math .round (Math .random ()*100 ) }; this .updateValue = this .updateValue .bind (this ); } updateValue (randomValue ) { this .setState ({ value : randomValue }); } render ( return ( <div > <Header title ={ this.props.headerTitle }/> <Content title ={ this.props.contentTitle } body ={ this.props.contentBody }/> <RandomNumber number ={this.state.value} onUpdate ={this.updateValue} /> </div > ); } } App .defaultProps = { headerTitle : 'Default header' , contentTitle : 'Default contentTitle' , contentBody : 'Default contentBody' }; export default App ;
코드 설명
Line 5: RandomNumber.js 를 import 한다.
Line 12: 초기 state 를 설정한다.
Line 16: updateValue() 메소드에서 this.setState 에 접근 할 수 있도록 bind 한다.
Line 20~22: state 를 변경 할 때는 setState({key: value}) 메소드 를 사용한다.
Line 31-32: RandomNumber 컴포넌트를 사용한다.
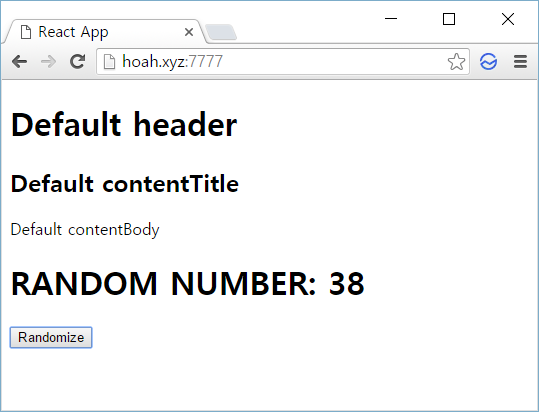
출력물
props 와 state, 생긴건 비슷하지만 용도는 다르니 헷갈리지 않도록 다음 특성을 기억하자.
특성
props
state
parent 컴포넌트에 의해 값이 변경 될 수 있는가?
예
아니오
컴포넌트 내부에서 변경 될 수 있는가?
아니오
예
참조

