React.js Component LifeCycle API 이번에는 React.js 컴포넌트의 LifeCycle API 에 관하여 살펴보겠다.
1. 시작하기 1 2 3 4 5 6 7 8 9 10 11 12 13 14 15 16 17 18 19 20 21 22 23 24 25 26 27 28 29 30 31 32 33 34 35 36 37 38 39 40 41 42 43 44 45 46 47 48 49 50 51 52 53 54 55 56 57 58 59 60 61 62 63 64 65 66 67 68 69 70 71 72 73 74 75 76 77 78 79 80 81 82 83 84 85 86 87 88 89 90 91 92 93 94 95 96 97 98 99 100 101 102 103 class App extends React.Component { constructor (props ) { super (props); this .state = { number : 0 , show : false } } _increase ( this .setState ({ number : this .state .number + 1 }); } _show ( this .setState ({ show : true }); } _unmount ( this .setState ({ number : 0 , show : false }); } render ( let component = (<Card number ={this.state.number} /> return ( <div > <Button caption ="Show Card" customClass ="green" onClick ={this._show.bind(this)} /> <Button caption ="Increase Number" customClass ="blue" onClick ={this._increase.bind(this)} /> <Button caption ="Unmount Card" customClass ="red" onClick ={this._unmount.bind(this)} /> {this.state.show ? component : ''} </div > ); } } class Button extends React.Component { render ( let className = "ui button " + this .props .customClass ; return ( <div onClick ={this.props.onClick}className ={className} > {this.props.caption}</div > ) } } class Card extends React.Component { constructor (props ) { super (props); console .log ('constructor' ); } componentWillMount ( console .log ('componentWillMount' ); } componentDidMount ( console .log ('componentDidMount' ); } componentWillReceiveProps (nextProps ) { console .log ('componentWillReceiveProps: ' + JSON .stringify (nextProps)); } shouldComponentUpdate (nextProps, nextState ) { console .log ('shouldComponentUpdate: ' + JSON .stringify (nextProps) + ' ' + JSON .stringify (nextState)); return true ; } componentWillUpdate (nextProps, nextState ) { console .log ('componentWillUpdate: ' + JSON .stringify (nextProps) + ' ' + JSON .stringify (nextState)); } componentDidUpdate (prevProps, prevState ) { console .log ('componentDidUpdate: ' + JSON .stringify (prevProps) + ' ' + JSON .stringify (prevState)); } componentWillUnmount ( console .log ('componentWillUnmount' ); } render ( console .log ('render' ); return ( <div className ="ui card" > <div className ="content" > number: {this.props.number} </div > </div > ) } } ReactDOM .render (<App /> document .getElementById ('app' ));
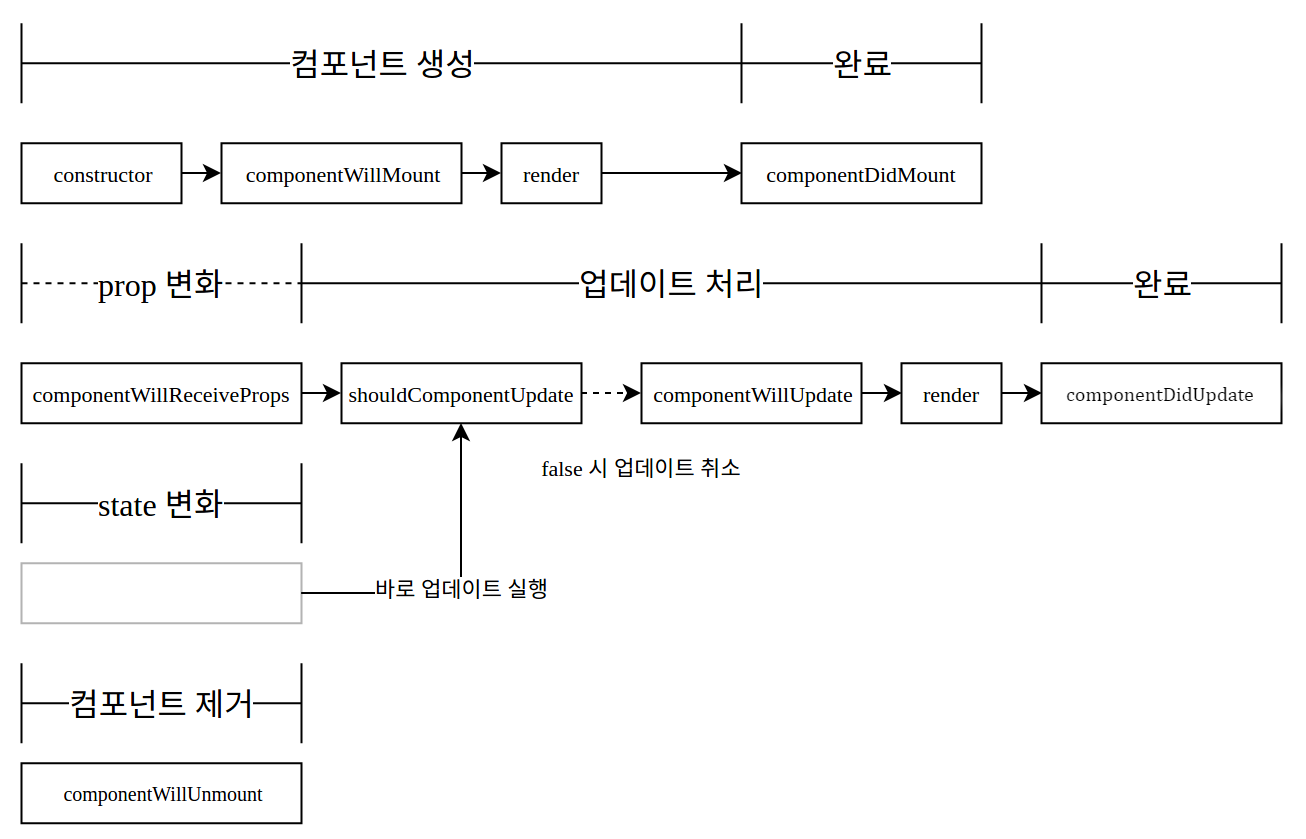
컴포넌트를 생성 할 때는 constructor -> componentWillMount -> render -> componentDidMount 순으로 진행된다.
2. 정리 LifeCycle API를 정리하면 다음과 같다.
3. 자세히 알아보기 위 메소드들이 어떤 역할을 하는지 자세히 알아보자.
constructor
1
2
3
4
constructor (props ) { super (props); console .log ('constructor' ); }
생성자 메소드로서 컴포넌트가 처음 만들어 질 때 실행된다.
componentWillMount
1
2
3
componentWillMount ( console .log ('componentWillMount' ); }
컴포넌트가 DOM 위에 만들어지기 전에 실행된다.
render
컴포넌트 렌더링을 담당한다.
componentDidMount
1
2
3
componentDidMount ( console .log ('componentDidMount' ); }
컴포넌트가 만들어지고 첫 렌더링을 다 마친 후 실행되는 메소드이다.
componentWillReceiveProps
1
2
3
componentWillReceiveProps (nextProps ) { console .log ('componentWillReceiveProps: ' + JSON .stringify (nextProps)); }
컴포넌트가 prop 을 새로 받았을 때 실행된다.this.setState() 를 해도 추가적으로 렌더링하지 않는다.
shouldComponentUpdate
1
2
3
4
5
shouldComponentUpdate (nextProps, nextState ) { console .log ('shouldComponentUpdate: ' + JSON .stringify (nextProps) + ' ' + JSON .stringify (nextState)); return true ; }
prop 혹은 state 가 변경 되었을 때, 리렌더링을 할지 말지 정하는 메소드이다.return nextProps.id !== this.props.id;JSON.stringify() 를 쓰면 여러 field 를 편하게 비교 할 수 있다.
componentWillUpdate
1
2
3
componentWillUpdate (nextProps, nextState ) { console .log ('componentWillUpdate: ' + JSON .stringify (nextProps) + ' ' + JSON .stringify (nextState)); }
컴포넌트가 업데이트 되기 전에 실행된다.this.setState() 를 사용하게 되면 무한루프에 빠져들게 되니 사용하지 않도록 하자.
componentDidUpdate
1
2
3
componentDidUpdate (prevProps, prevState ) { console .log ('componentDidUpdate: ' + JSON .stringify (prevProps) + ' ' + JSON .stringify (prevState)); }
컴포넌트가 리렌더링을 마친 후 실행된다.
componentWillUnmount
1
2
3
componentWillUnmount ( console .log ("componentWillUnmount" ); }
컴포넌트가 DOM 에서 사라진 후 실행되는 메소드이다.
참조
